I’ve been approached a half dozen times in the last couple weeks for tips and tricks for a fledgling tank. Rather than rehash that information over and over on an individual basis I put this guide together. It’s my hope it can helpful to someone. I don’t consider myself and expert and my opinions are only as good as the information I currently have available to me!
I’m sorry I don’t have a TL;DR version.
I didn’t post this in the wiki because I wanted others to be able to contribute in a discussion if they felt compelled.
New World is the first MMORPG I’ve played where the formula to achieve the ideal tank build is more subjective than objective. When chosing items, weapons, and weapon abilities it’s a game of pros and cons and finding the right mix that suites your personal playstyle and how you approach tanking. This guide is a culmination of my subjective take on tanking in New World.
Perspective of this Guide
This guide is written with the assumption that your attempting to optimize both survivability, threat, and utility. That your main weapon for tanking is Sword and Shield and that the path of least resistance to tanking is using weapons that synergize with the Sword and Shield. This means choosing from the wide selection of Strength weapons available with Taunts. The blunderbuss is a new weapon which has a taunt enabled ability. I have not had a chance to play with this weapon enough to determine how it fits into my arsenal so it won’t be mentioned further in this guide but know it is a potential option if you feel comfortable fleshing out how you can make it work.
Attributes
There are two popular approaches to how you setup your attributes. You try to get to 300 Constitution and put the rest in Strength; or you can go 200 Constitution and try to reach 300 Strength. No matter which way you go there are trade offs that must be made and upto 250 in either attribute provides tangible benefits to a tank.
50 Str - 5% Damage on Light Attacks
100 Str - 10% Damage on Heavy Attacks
150 Str - 50% Stamina Damage from Light and Heavy Attacks
200 Str - 10% Damage on CCd enemies
250 Str - Stamina Regen when doing Light and Heavy Attacks
300 Str - All melee attacks gain GRIT
50 Con- All health consumables are 20% stronger
100 Con - Max health increased by 10% of physical armor
150 Con- Doesn’t apply to PVE as mobs can’t crit.
200 Con - 20% armour (by extension of 100Con also 2% health)
250 Con - 80% Damage Reduction when at Full Health (60s Cooldown)
300 Con - reduced CC effects
Your hitpoints scale with your Constitution however each teir of an attribute you take the benefits you gain per point for that attribute diminishes. This is true of each stat including constitution.
The 300 constitution perk is nearly universally considered useless for tanks. Most NPC CC effects are 2-3 seconds, there isn’t much of a difference between a 2.4 and a 3 second knockdown or stun.
The 250 Constitution perk is also highly suspect in value. The 80% reduction is nice but how often are you going to be at full health to take advantage of that? How often will that 80% reduction apply to an appreciable attack versus an enemies light atttack? In practice your rarely sitting at full health and rarely will this proc and at a meaningful time.
The 150 Constitution perk is useless in PVE since enemies can not at this time and hasn’t since Beta been able to critically strike a player character. So any critical damage reduction like resilience on armor is absolutely useless in PVE.
200 Constitution
Personally, I prefer to run 200 Constitution and put the rest into Strength. My logic is that:
-
There isn’t a boss in the game that can one shot you with 200 constitution unless you fail mechanics. Adding the hit points from 300 Con doesn’t save you from failed mechanics, you’ll still get one shot on those same abilities.
-
The extra HP from the extra 100 Con does come into use in large pulls but higher strength allows you to hold better threat easier on all those enemeies and kill them faster so you while you may have less health of a buffer, enemies live shorter periods for it to be a problem.
-
300 Strength GRIT can’t be understated in value. I don’t know why they don’t have some form of GRIT built into the SnS line for tanks. But being immune to knockdowns and stuns while attacking makes it easier to break stamina bars and do the things you need to do as a tank.
The thing you have to be aware of is that you have to help heal yourself in this build. It is incredinly important that you run: Leeching, Regeneration, Health and Divine; and if you can get it Life Stealing. If you’ve grouped with me you’ve seen me surivive long after the rest of the group has died solo sometimes finishing bosses the last 20% by myself. I can do that because I have all those perks on my gear and I have an incredible amount of self passive healing in my tank set.
I also chug consumables like they are candy and given away free on every street corner. More on consumables later.
300 Constitution
While I prefer 200 Constitution - I do occassionally run 250-300 Con tanks specs. The caveat is that when you run more con your directly reducing your threat because you are direclty removing damage output which is how threat is generated. In my experience no matter what you do, you are always short a taunt somewhere no matter what build you run and what gear you run. It’s a rare occasion where everything aligns and everyone is assisting how they should, leaving range targets you have aggro of alone and you feel like you have everything and are holding aggro just fine.
If you run 300 Con I still highly recommend the perks mentioned in the 200 con build however you more than likely are going to want to pickup Hated on your weapon and jewelry.
Note: Typically perks don’t stack if they appear twice on a weapon. The sword and shield treates the two items as one weapon. Every perk we have tested fails to stack when put on both a sword and shield. There are perks we have no way of testing like hated but, my gut tells me it doesn’t stack on both your shield and sword.
Blocking and Dodging
Its at this point I want to point out that you generate no threat when you block. Staying in a block animation until block breaks is one of the biggest mistakes I find rookie tanks making. Additionally, stamina doesn’t regenerate while you are holding block.
So holding block is a detriment to you and your life. You have to get comfortable with the attack patterns of bosses and you have to consciously release block and only apply it right before attacks hit to optimize your stamina regeneration.
It should also be noted that dodge and block use the same stamina pool. Early in my tanking I found myself using dodges to move away in certain situations faster only to find myself unable to block when I posted up to tank a boss. Don’t waste stamina on “movement” dodges, only dodge to iframe an attack.
Also, it is worth mentioning here that the another two perks that are pretty much manditory are Sturdy and Hearty.
The two perks combined allows you to block a third attack in a row as opposed to two in many situations. Stury reduces stamina damage you take by 10% while Hearty increases your total stamina by 10%.
Iframes
You will hear and see this term Iframe a lot from players who have played action rpgs alot. Basically the dodge mechanic works as more than a movement. There is a part of its animation during which you are immune to literally everything. It’s a “missed me” type attack. If you get good with dodge you can avoid a lot of the nastiest attacks in the game but it requires practice and attentive attention to detail. Nearly every attack from an enemy in New World is telegraphed.
Telegraphing
Telegraphing is the term used to express the situation where an enemy says or does something that clues you in that an attack is coming.
Nearly every attack in the game that has severe consequence has a telegraph and it’s a matter of learning to recognize them and remember them that allows you to avoid them as a tank.
A few examples:
-
Neishatun in Tempest Heart - He kind of sits back crouching down like a track runner right before he charges and does the tail whip slam attack which is easily dodged.
-
The Caretaker in Genesis - He turns away from the tank, reaches down into the ground and then casts Vile Wave.
-
Greenskeeper in Genesis - Reaches back and rears up very tall right before performing the Mighty Slam attack.
Other Important Perks
Refreshing Ward Your mileage will vary with this perk, I stack it but, you have to be aware that it only works if you take damage. If you block an attack you get no reduction from it. However, in large pulls where you are getting attacked by many different mobs its procing like crazy and your cooldowns for defiant stance are incredibly short between the Ward and Reverse Backstab. Allowing you to taunt more frequently and keep 30% damage reduction up. Though with Refreshing Move on your weapon this becomes less and less important.
Refreshing Refreshing is an acceptable alternative to refreshing ward as you will have a static 2.8% cooldown reduction on everything. In boss encounters it can out perform ward but in large trash pulls refreshing ward out performs refreshing. Their exclusive so you can only have one on your gear.
Wards There are a series of perks that have the word “Ward” in them. My suggestion to you as a tank is to put these in a bank anytime you get one that has CON and/or STR and is Heavy Armor. If it has a useful perk for you on top of that it is icing on the cake. In higher mutators you may find it useful to stack ward gear for the instance you are doing to make it easier to heal you. Some tanks get by without this but those tanks are incredible at avoiding avoidable damage 100% time others need this. But it is a pain in the ass to build later if you don’t start working on it and saving it.
Refreshing Move I’m currently emphatuated with this perk on weapons. There are a few easy to get swords that come with this perk. It reduces your active cooldowns by 2.8% everytime you make a heavy or light attack. This makes it incredibly easy to spam your attacks to get your taunts back when you really really need a taunt or the damage reduction from defiant stance. I’ve moved to a point where I tank exclusively with a sword with this perk on it over something like curiosity and greed that is clearly more defensive because to me the cooldown reduction is defensive with more defiant stance up time.
Refreshing Toast You saw I said I chug potions…I really chug potions. This perk is a 30% reduction in the cooldown on potions. Make sure you have this on your jewelry.
Lifestealing and Leaching Both of these perks cause you to regain 5% of your damage as health. One is exclusive to weapons and the other is exclusive to jewelry. Lifestealing is on both of the popular Refreshing Move swords that drop.
Regeneration Regenerate .5% of your health every second passively. Doesn’t seem like a lot but you regenerate 30% of your health every minute on your own. Every bit helps in the effective health game.
Any Fortification, Self Heal Perk, or Damage Perk Prioritize any other perks you can that provide any sort of self fortification effect like Fortifying Shield Rush, any sort of self heal like Leeching Path of Destiny, or any dapage perk like Empowering Whirlblade.
Make sure you have the weapon ability perks for the abilities you choose on your armor. A perk for an ability you don’t have slotted is a dead perk.
Weapon Perks and Gear Slots
Regardless of your role I will always recommend that you find and focus on your key integeral perks and put those on your chest and legs. These two pieces are the most expensive pieces to roll via crafting. Make sure your SnS perks are on them especially ones you always run. Then put the secondary weapon perks on your helm, gloves, and feet which are the cheapest to reroll.
Secondary Weapons
There are a few different weapons that scale with strength that have taunt enabled abilities: Hatchet, Hammer, and Great Axe.
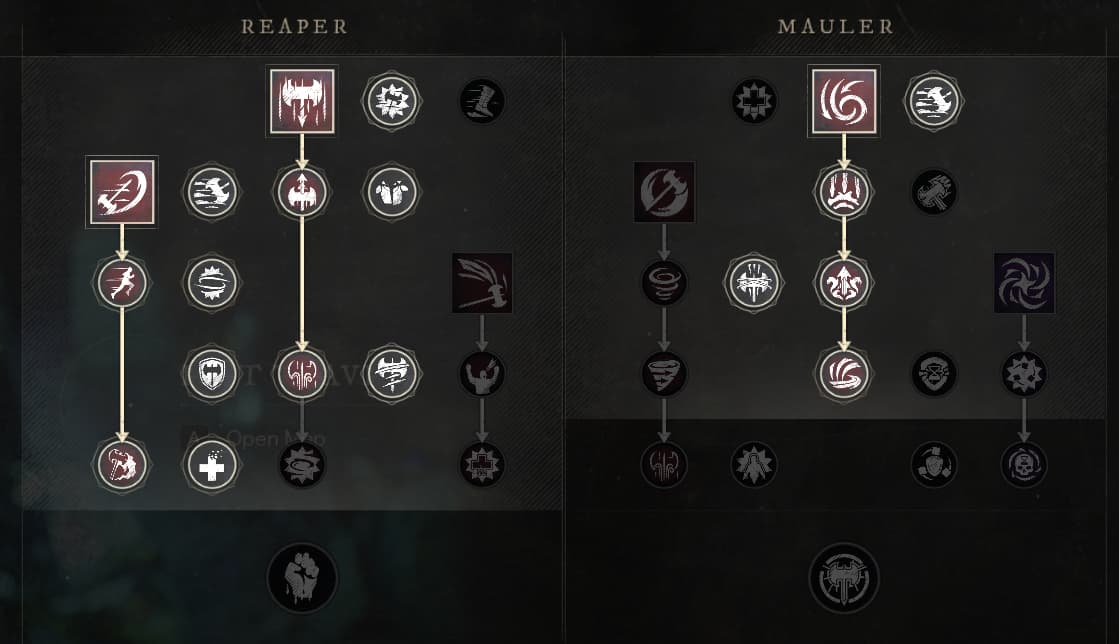
You will want to have all three of these at mastery 20 ASAP if you are tanking and you will want to find yourself an example of each to carry on you at all times with your sword and shield. Situationally, you’ll need all three depending on the instance and pull.
Between the weapons they each have unique taunt features.
Hatchet. The hatchet’s taunt is a very large area taunt like defiant stance. The hatchet also has the added benefit of having a built in death save on the first hit that would kill you while holding a hatchet if you go deep enough in the berserk tree.
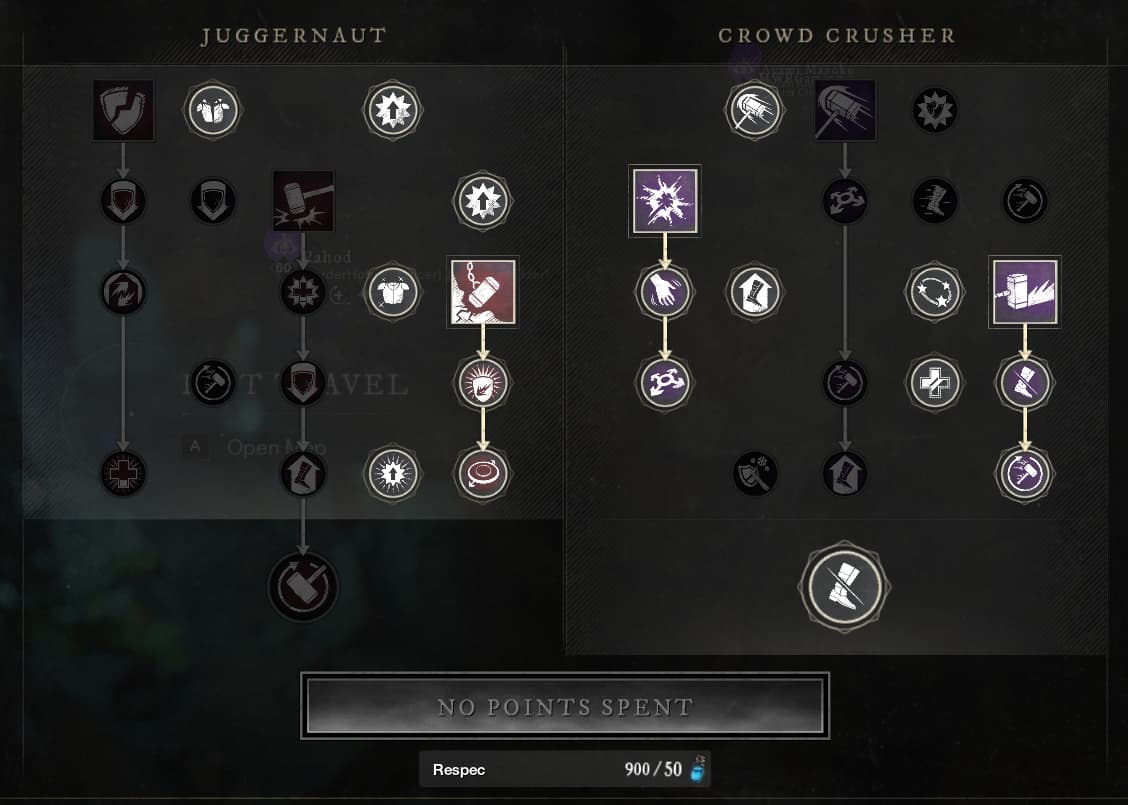
Hammer. Provides a lot of CC. The taunt is built into shockwave which can be improved with Sundering Shockwave perk to grant rend as well.
Great Axe. Has some utility with pulling groups of mobs together and provides a directional column like taunt with Reap where all mobs hit are taunted. The benefit here is you can more easily taunt a single mob if you need to in a backup tank situation.
No matter which you choose. Get comfortable with the concept of swapping weapons getting the abilities off quickly and switching back. For me I run hatchet for the taunt and being it has a very short cooldown (1/3rd of defiant stance), I typically have to swap into hatchet taunt and back out once every 15 seconds or so.
Weapon Swapping and Buffs
As a general rule: any buff you apply to yourself such as the berserk self heal will go away when you swap weapons to a different weapon. The same is true of defiant stance’s 30% damage reduction for 8s.
You need to be aware of this and make sure your not wasting self buffs when you swap.
That said; taunts and debuffs you apply to enemies with a weapon are generally not lost by this weapon swap. So you can safely swap from SnS to a secondary weapon taunt and swap back and taunt remains on the enemies.
General Tank Tips
-
You need to play in third person scrolled out as far as you can with max field of view. Even in comms, healers often don’t let you know something is attacking them and with how much you have to keep track of it’s sometimes not possible to tell or see if your healer is being attacked unless you can zoom out to see them.
-
Keep the mobs facing away from your melee party. Try to explain telegraphed attacks to new melee and explain cleave mechanics. Know the hitboxes for enemies and encourage dps to move back to the furthese point they can.
-
Try to be mindful of what mobs you corner. Melee will follow you and some mobs like spearmen will kill your melee dps with their lunge/spear attacks.
-
Try not to move mobs around a lot and void attacks that lunge you forward except when your confident the mob isn’t going to lunge at you. It’s common for mobs to have attack that lunge and using abilities like reverse backstab for example or shield rush that moves you 2-3m forward will cause you to pass through the enemy if they lunge at the same time. This causes the mob to spin around and eat your melee.
-
Sometimes a corner is your friend and sometimes it is not. A mob that has a pushback when your blocking and moves you around a lot is safe to back yourself into a corner. A pack of mobs with quick stagger attacks is not safe to go into a corner. Cornering yourself prevents you from dodging and it can be nasty if you aren’t conscious of what your allowing to corner you.
-
Practice and learn line of sight pulls. There are quite a few of them in the expeditions that can help you safely split up pools and isolate mobs into cornerable positions that usually jump around wasting time and aggroing nearby enemies. Communicate your intent as many DPS aren’t used to tanks doing LOS pulls.
-
Don’t assume everyone runs the instance how you normally tank it. Communicate any activity you plan to do that isn’t as simple as move to the next mob in the instance and kill it. If your skipping mobs explain your running past. If you plan to stop and kill them, explain that, if you plan to jump up and leash it explain that. There are dozens of ways these expeditions get ran and I’ve never regreted taking a second to explain what I had planned. I have regretted not doing that a number of times.
-
Certain AI like javalineers and bowman have a jump back animation. These mobs are dumb. They always jump backwards. They face their primary threat target (you) and jump away. So intentionally position yourself so that their back is to a wall. Then when they jump back they have no where to go.
-
Get comfortable with tagging and watching. This to me is hitting a mob at range with something like path of destiny on a pull to establish aggro and just watching the threat outline on the nameplate. As long as you have threat you can ignore it and leave it at range. Be ready to move and taunt when the outline shows you lost threat.
-
Remind your healer to run mobs through you not away from you. Emphasize “through” not “to”. Don’t run to me and stop on me as a tank. Run the mob through me so my natural attacks cleave it and pull it off you. Better yet do it and let me know “dragging a mob to you”. Nothing worse than chasing a healer to get a mob trying to kill them, while they aren’t paying attentiont to heals, losing aggro to everything else to save them getting everyone else killed.
-
90% of groups will expect you to be the shot caller. Get comfortable with push-to-talk and get comfortable with the encounters. It wont be pretty to start with, you’ll be horrible at avoiding your own telegraphs, moving and calling but practice makes perfect and eventually it becomes second nature. There are an amazingly large amount of healers and dps who rely on someone else giving them ques - save yourself the headache and take that challenge on yourself and try to do it the best you can. Because your stairing at the mob and you have to know the telegraphs yourself anyways your the best person for this job.
-
Don’t skimp on consumables, gear, or gems. The tank and healer are the two roles that really can’t afford to skimp on anything when it comes to cost. With DPS your 1/3rd of the equation. One person doing 1% less damage is a net loss of like a .3% damage for the group. As a healer or a tank your the only one responsible for healing health or absorbing damage. Every little bit you can do to help in that regard improves the odds for success.
-
Don’t waste money. While you shouldn’t skimp. Not using expensive consumables on content you have on “farm status” isn’t skimping. Know when it’s time to stop wasting the good stuff and try to get by on cheaper consumbles or no consumables at all. This really goes for everyone. Consumables are a crutch for getting past hard content when your learning it. Don’t chug 200g oakflesh balm potions on a cilla normal attempt for example. Use lower tier potions or avoid using them.
-
There are audio ques that go with the visual ques of the game. I know many players turn their audio down or up. I would recommend tweaking your settings so that you can hear the NPCs talk. Many attacks have an actual specific dialog that acts as a telegraph. There is also the option to turn on subtitles in settings.
-
After each patch re-evaluate all your build choices. You never know what has been fixed or broken. Don’t assume everything is business as usual. If you go into an instance and something feels off, usually something changed integeral to your build. Figure out what it is.
-
Hearty Meals will give you the intial short duration burst health regen while in combat. It will regen health until you take direct damage even through dot ticks. Get used to keepign this on your toolbar and using it as an emergency heal even if you have to kite mobs around to keep the regen ticking while you wait for a heal or for dps to kill the remaining mobs. This trick has salvaged many wipes.
-
Healers have a perk in their build that causes their heals to heal for more for each buff the target has active on them. Every single buff you can stack on yourself from consumables helps increase the healing from that perk for the most part.
Sword and Shield Specs
The part you probably wish I had gotten to earlier. Specs. There are two different builds for tanking and the two are very different in terms of playstyle. You can either try to pickup the Leadership buff and provide your group a 10% damage boost or you can pickup the Defensive Formation buff and provide 30% damage mitigation to friendly targets near you when you are blocking.
Both are amazingly good talents and its too bad we can’t have both.
In general, Reverse Backstab and Defiant Stance are universally accepted as manditory perks. I’ve seen some tanks go full defender and ignore the left tree entirely and while it can work in my experience those tanks have threat issues especially when they go and mix that with a high CON build.
Reverse Backstab reduces the cooldowns of every other sword and shield ability by a minimum of 25% upto 100%, where its 25% more for each mob you hit with the ability. In large pack pulls you can easily reset your entire set of abilities with a well landed backstab.
If you perk into Reverse Backstab with Contagious Reverse Backstab then you return a debuff from yourself to an enemy you hit. Which as you are using this ability pretty regularly its like a passive debuff removal.
Defiant Stance is the better of your two taunts in the sword and shield weapon. It’s a large area of effect taunt and it also has a 30% damage reduction for its duration. It also has one of the longest cooldowns in the game at 45 seconds by default.
So anything and everything you can do to refresh its cooldown is a must to be an effective tank and don’t forget it’s not just a taunt it’s a defensive cooldown.
Your basic template for Reverse Backstab and Defiant Stance is:
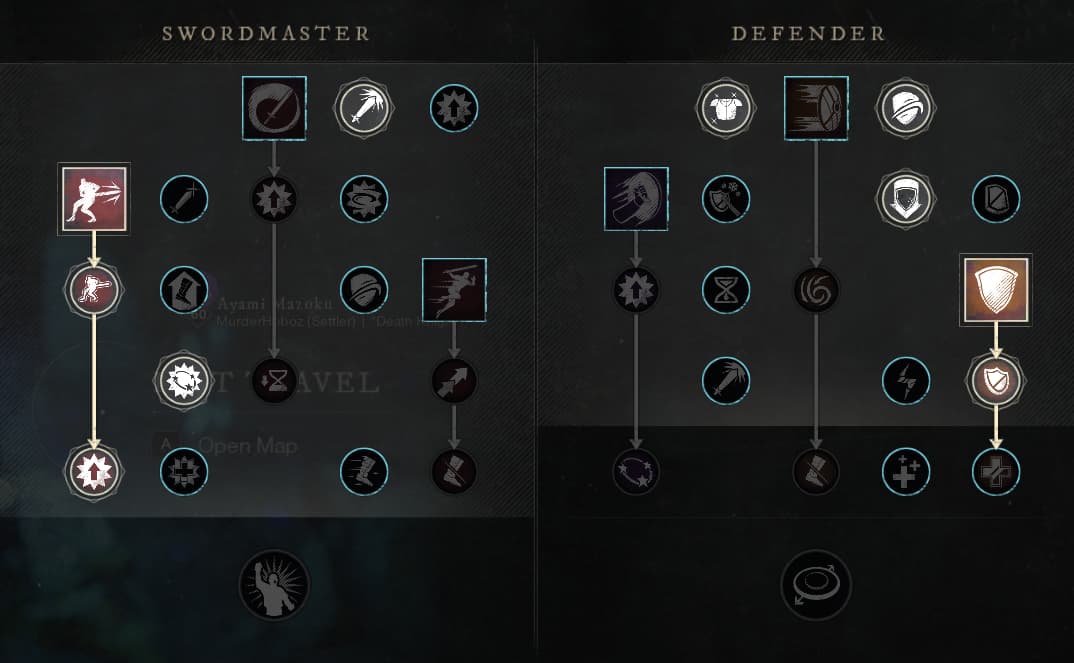
Swordmaster: Empowered Stab, Reverse Backstab, Unstoppable Stab, and Opportunist, and Tactician.
Defender: Sturdy Shield, Sturdy Grip, Defensive Training, Defiant Stance, and Final Countdown
The Restoration upgrade to Defiant Stance is a purely personal choice. A self heal for 15% of your max health 8s after you taunt is a good perk but you sacrifice other good perks for it. I run it personally but its worth careful consideration.
From here you have to decide on if you want the Leadership Buff or the Defensive Formation buff.
For Leadership Buff:
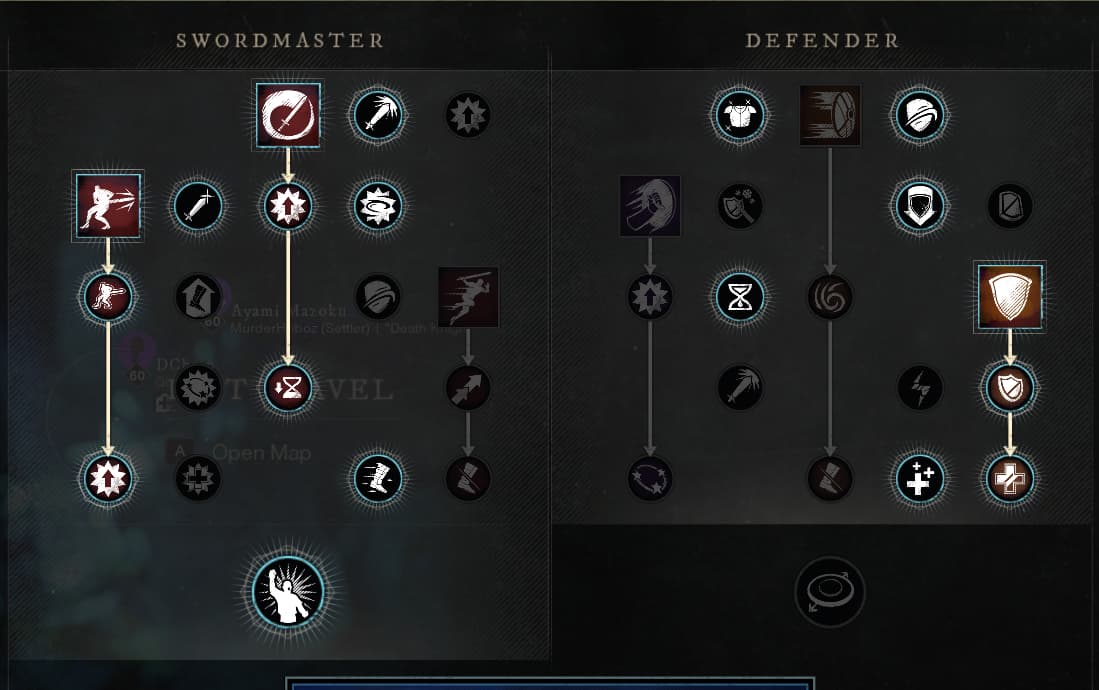
Leaping Stike is currently bugged you stop mid flight if you take any damage so I don’t consider it a viable ability in the tree. Whirlblade is amazing AOE threat and damage and pairs well with leadership.
Swordsmaster: Whirling Blade, Opportunity, Tactical Strike, Freeing Justice, Precision, Critical Precision, Leadership (Drop Opportunist as it’s not needed due to Tactucak Strike)
Defender: Defefnsive Training, One with the Shield, Recuperation, and Restoration.
Precision because it procs all the Keenly perks you get on gear and weapons. Freeing Justice because being able to dump a debuff at will is extemely powerful. Critical Precision can be swapped with any other perk of choice in the tree but you need that point to reach leadership. Other good options are: Counter Attack or Mobility.
For Defensive Formation Buff:

Swordsmaster: Achilles’ Heel
Defender: Defensive Training, Elemental Resistance, One with the Shield, Shield Rush, Improved Rush, Intimidating Rush, Recuperation, Restoration, and Defensive Formation.
Here depending on your cooldown situation with perks One with the Shield can be moved around as needed. The reason we pick up Achilles’ Heal is because we now have multiple abilities applying slow and that makes Opportunist which we need to reach Tactician more useful.
Taunting when you Already Have Aggro
Taunt works by pushing you to the top of the threat table and giving you an amount of extra threat above the person who was previously on top of that threat table. This means taunting, when you already have aggro can and does still increase your threat. Be careful not to use another taunt, while the previous taunt debuff is active, it isn’t overwritten and it doesn’ stack. So unless you apply the new debuff you don’t get anything for taunting not even the threat gain.
Cross Taunting
As stated in the previous section you can’t overwrite a taunt. This works for your own or another player’s taunts. So if your in a multi tank situation and you don’t have a single target taunt you can wait for the other tank to taunt and then taunt. Your taunt will only hit enemies that were’nt taunted by the other tank.
Also when in a two tank sitautions and you aren’t the main tank I strongly encourage you to equip a non carnelian gem weapon in your offhand. That way you can freely dps without worrying about tauniting the enemy. You do NOT want to be that guy who taunts off another tank and causes a cleave to kill half your group.
Armor Weights and Resistances (Gems)
When you hover over your stats in the inventory screen you get a popup that lists resistances. This only shows resistance %s from buffs and gems, it doesn’t factor in your base resistance from armor.
Armor comes in 3 resistance versions. One that is heavy towards elemental, another that is heavy towards physical, and a third that is balanced. Initially until you get into higher mutators or situations where you need specialized gear you should probably stick to a balanced approach both for the armor and your gems. Try to have equal amounts of physical and elemental resistance.
Once you start doing mutators and on higher levels you can rely on ward gear to mitigate the physical damage while stacking specific gems for the mutated elemental damage type.
Gear
Swords: Curiosity,Greed (Lazarus), Deeproot (Eternal Pools), Infernus (Myrgard)
Shields: Muwhahahaha really LOL. Shield drops are so few and far between the trading post is your friend. Crafted and force Sturdy and pray for good perks. 600 Legendary Shields are a myth…no really…super rare super expensive and never crafted.
Amulet: Crafted - you want Divine, Health, and Fortified to replace your Infinity Crystal quest item but its a god roll i’ve never seen. I have refreshing ward and divine on mine.
Ring: Smooth Bone Ring (Lazarus)
Earring: Doom’s Chance (Genesis), Blackmetal Stud (Lazarus)
Armor Sets: Contrary to common belief Voidbent isn’t a great tank set. No perks for weapons skills, no cooldown reduction, resilience is a dead perk, luck doens’t help you tank. Chardis in Lazarus drops a complete ancient bane set of gear. There is a set of corrupted tank gear that drops in Tempest. Outside of that you really just craft pieces for perks and pray for good random drops. Save enough cooldown materials to craft a 590+ set and you have a reasonable starting set.
Consumables
The obvious ones you should already know about is Health potions and Regeneration potions do not share a cooldown.
As mentioned in the tips hearty meals can be used as a temp regen buff in combat.
Oakflesh Balm is a consumable made by armorsmith that reduces all physical damage taken for a period time. It’s incredibly useful on physical damage heavy fights.
Gemstone Dust is a consumable made by jewelcrafters that reduces all elemental damage taken for a period of time. It’s incredibly useful on elemental damage heavy fights.
Inscense is made by furnishers and its not quite clear how it helps in general but it’s another buff that stacks on you. Keeping in mind the tip about buffs and heals.
Be Humble, Be a Life Long Learner
Tanks put in a lot of effort learning and retaining information about fights. Many let this get to their head and it affects how they treat others. Don’t let that be you. Everyone starts somewhere and we more than others are in the best position to help other players learn.
Also, information and game design changes on a dime and if you don’t accept that things change and aren’t able to quickly adapte and adjust it’s going to be a very rough road for you as a tank. Many changes in the game to other classes or even bosses directly affects us more than most other roles.
Healers get nerfed we have to survive better. Boss mechanics change we have to learn them. Dps gets nerfed we have to survive longer. We get nerfed, we have to find other tricks and strategies to cope with mechanics.
Accept. Adapt. Overcome.
Secondary Weapon Builds
Going deep into the nuances of the secondary weapon builds is beyond what I want to do in this initial guide however I will provide my builds for Hatchet, Hammer, and Great Axe.
Hatchet
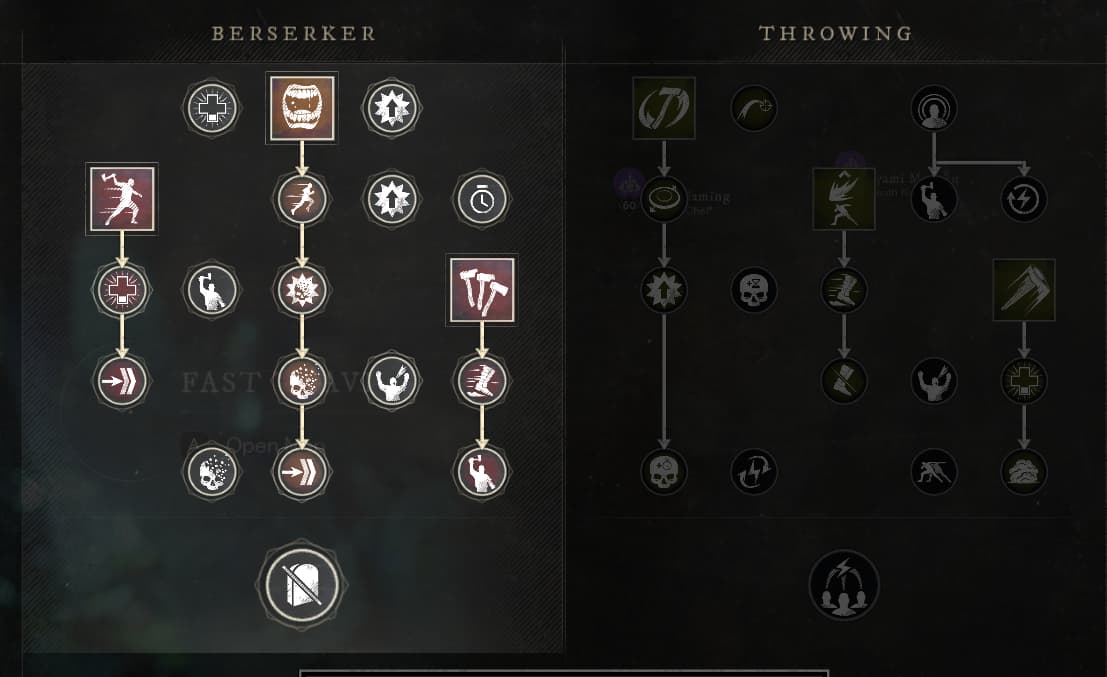
Great Hammer
Great Axe